At Traintrackr, our mission is to keep your boards brilliantly lit with the most up-to-date information from transit networks, weather providers, and other dynamic sources. We understand how important it is for your board to remain an engaging centerpiece, continuously displaying live data.
Occasionally, external data providers may experience temporary interruptions (like when Transport for London addresses a security incident affecting their live feeds). To ensure your board remains active during these rare moments, we’ve developed a feature that allows your board to display alternate data. This means your board can seamlessly showcase previously recorded information from prior weeks or months until the live data feed is restored.
How It Works
- Automatic Activation: When a live data feed experiences issues, your board can automatically switch to alternate data, keeping your display consistently vibrant.
- User Control: You have the flexibility to enable or disable this feature anytime by visiting your Traintrackr dashboard, selecting your device, and clicking the ‘Alternate Data’ button.
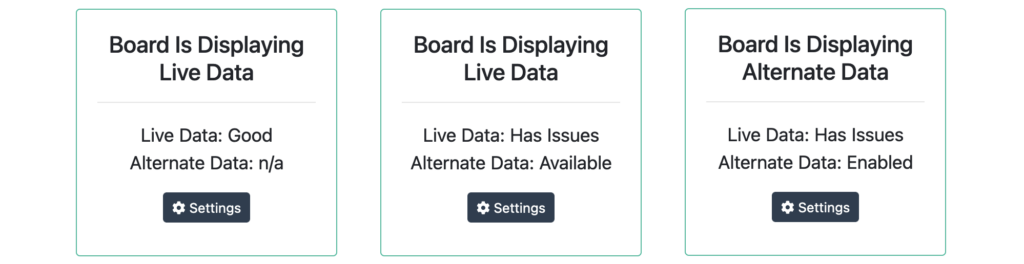
- Status Updates: Check your current data status on your device dashboard. The status box will indicate one of the following:
- The board is displaying live data with a healthy data source.
- The board is displaying live data, but alternate data is available due to minor issues.
- The board is displaying alternate data because of temporary live data interruptions.
While the alternate data feature is currently in an experimental phase, it’s designed to ensure your board remains a constant source of information and enjoyment. In the rare case we’re replaying data from a period that had its own gaps (due to past data issues or scheduled maintenance), those gaps might briefly reappear. However, we’re continuously improving this feature to make it even more seamless.
Rest assured, our priority is to display live data whenever it’s available—which is almost all the time. This feature is simply an added layer of reliability, so your board stays illuminated and engaging, regardless of external data fluctuations. Thank you for being a valued part of the traintrackr community. We’re dedicated to ensuring your product remains a timeless addition to your space.